PHONG PHAN
18/8/2024
Setup React Typescript with Vite & ESLint
Hello dear coder friends! 😎 Today, I’m taking you on a super fun journey to set up a clean and professional React project using Vite, TypeScript, Tailwind CSS, shadcn/ui and ESLint. This is the ultimate combo that many professional dev teams use. Not only is it powerful, but this setup also helps you write clean, beautiful code and avoid the headaches caused by random bugs. Let’s get started!

🚀 Set Up a Super Slick React Project with Vite, TypeScript, Tailwind CSS, ESLint, and shadcn/ui — Full, No Secrets!
Hey beloved coders! 😎 Today, I'm going to take you on a super fun journey to set up a perfectly structured React project, using Vite, TypeScript, Tailwind CSS, ESLint, and shadcn/ui for a stunning user interface. This is the "ultimate combo" that professional dev teams swear by. Clean, beautiful code, and no headaches from small errors. Let's dive right in!
🎯 Why Set Up Properly?
- Vite: Lightning-fast builds, smooth hot reloads — basically, it's "way cooler" than Create React App.
- TypeScript: Helps you code with confidence, no more guessing like in JavaScript.
- Tailwind CSS: Create stunning UIs without writing long CSS.
- ESLint + Prettier: Keeps your code squeaky clean — your teammates will be impressed!
- Shadcn/UI: Beautiful, customizable components that integrate perfectly with Tailwind.
What are you waiting for? Let's code! 🚀
🛠️ Step 1: Create a Project with Vite
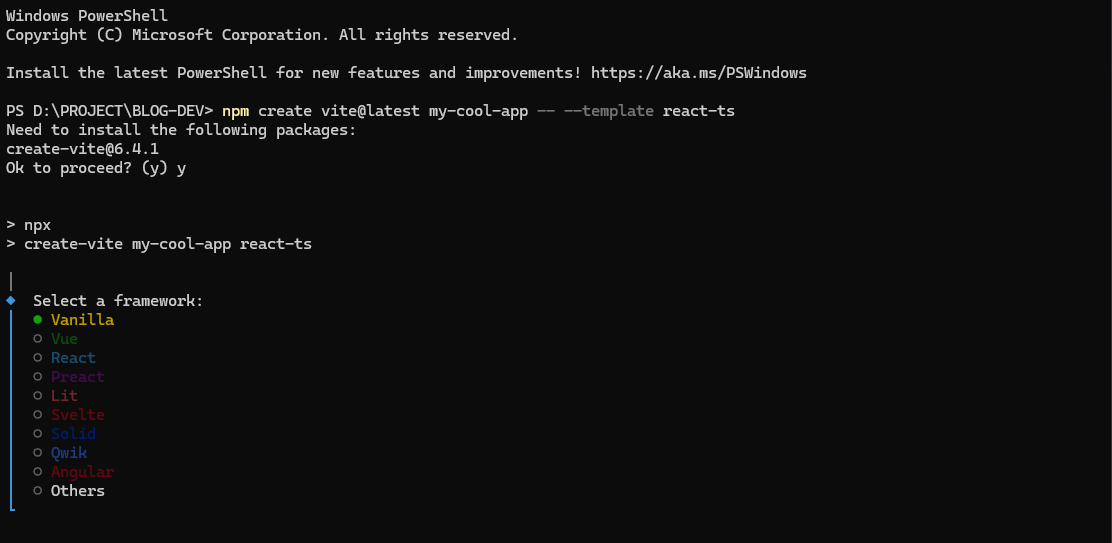
First, open your terminal and run this command to create a React project with TypeScript:
DummyComponent.jsx
1
2
3npm create vite@latest my-cool-app -- --template react-ts
4cd my-cool-app
5npm install
Chú ý :
- Sau khi chạy thì nó sẽ yêu cầu nhập tên dự án , Tiếp theo là chọn Framework
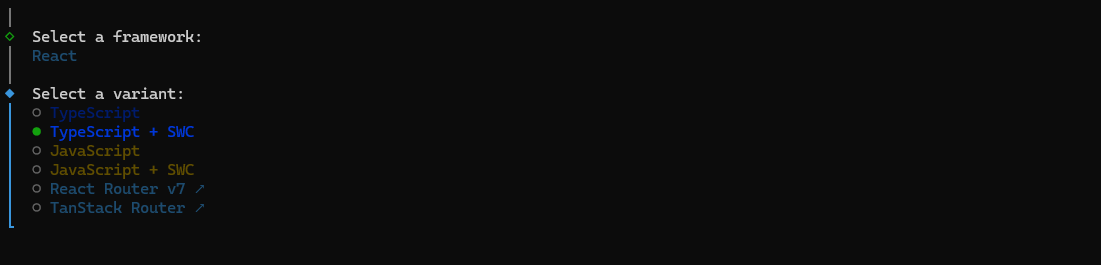
- Chọn template, ở đây mình chọn
TypeScript + SWC, SWC sẽ thay thế Babel cho việc biên dịch code Typescript/Javascript. SWC có tốc độ nhanh hơn 20 lần khi so với Babel
Vite creates a super lightweight project, starting up faster than Usain Bolt running 100m! 🏃♂️
🎨 Step 2: Install Tailwind CSS
Tailwind brings a fresh breeze to web development, though not everyone loves the way it codes. Personally, I’m hooked and can't stop using it!
With its inline coding style, not every developer is a fan, but since 2019, it has become extremely popular.
I personally love how you can just copy and use it without affecting other files. Tailwind CSS is the "secret weapon" for building beautiful UIs with minimal effort. It's 2025, and we don’t need to write pure CSS anymore — it’s exhausting 😁. Plus, Tailwind is already on version 4.x, so I’ll guide you on using the latest version! 😁
DummyComponent.jsx
1npm install tailwindcss @tailwindcss/viteAdd the @tailwindcss/vite plugin to your Vite configuration.
DummyComponent.jsx
1import { defineConfig } from 'vite'
2import tailwindcss from '@tailwindcss/vite'
3export default defineConfig({
4  plugins: [
5    tailwindcss(),
6  ],
7})
Import Tailwind CSS
In the previous version, Tailwind 3.x, you had to create a tailwind.config.js file and add the @tailwind base, @tailwind components, and @tailwind utilities lines to your main CSS file. But now, everything is much more streamlined — you just need a single line @import "tailwindcss" in your main CSS file, and you're good to go. So convenient, right? 😎
DummyComponent.jsx
1@import "tailwindcss";In the CSS file, I have the basic configuration as follows. In this file, you can customize Tailwind’s default styles like colors, shadows, and more, or even define your own styles. I’ll write a separate post to cover this topic in detail.
DummyComponent.jsx
1@import 'tailwindcss';
2
3@theme {
4  --color-1: #121063;
5  --color-2: #3ab7bf;
6
7  --shadow-2xs: 0 1px rgb(0 0 0 / 0.05);
8  --shadow-xs: 0 1px 2px 0 rgb(0 0 0 / 0.05);
9  --shadow-sm: 0 1px 3px 0 rgb(0 0 0 / 0.1), 0 1px 2px -1px rgb(0 0 0 / 0.1);
10
11  --breakpoint-2xl: 1200px;
12  --breakpoint-3xl: 1500px;
13
14  --font-sans: ui-sans-serif, system-ui, sans-serif, 'Apple Color Emoji',
15    'Segoe UI Emoji', 'Segoe UI Symbol', 'Noto Color Emoji';
16  --font-serif: ui-serif, Georgia, Cambria, 'Times New Roman', Times, serif;
17  --font-mono: ui-monospace, SFMono-Regular, Menlo, Monaco, Consolas,
18    'Liberation Mono', 'Courier New', monospace;
19}
In the App.tsx file, I add the following code:
DummyComponent.jsx
1function App() {
2  return (
3    <div className='flex items-center justify-center h-screen bg-gray-100 gap-2'>
4      <div className='bg-1 w-[300px] h-[300px] '></div>
5      <div className='bg-2 w-[300px] h-[300px] '></div>
6      <div className='bg-red-100 w-[300px] h-[300px] '></div>
7    </div>
8  )
9}
10
11export default App
Once everything is set up, run npm run dev to see the result 👌 If it looks like this, you're all set with Tailwind! 😂

🧹 Step 3: Install ESLint + Prettier
No one wants their code to be as messy as their desk after a week of deadlines! 😅 ESLint and Prettier will help keep your code neat and clean:
DummyComponent.jsx
1npm i prettier eslint-config-prettier eslint-plugin-prettier -DOpen the eslint.config.js file. Add this value to the ignores array. The goal is to prevent ESLint from checking the vite.config.ts file.
DummyComponent.jsx
1'vite.config.ts'Import this at the beginning of the eslint.config.js file.
DummyComponent.jsx
1import eslintPluginPrettier from 'eslint-plugin-prettier'Add the following code to the rules object to include Prettier rules.
DummyComponent.jsx
1'prettier/prettier': [
2      'warn',
3      {
4        arrowParens: 'always',
5        semi: false,
6        trailingComma: 'none',
7        tabWidth: 2,
8        endOfLine: 'auto',
9        useTabs: false,
10        singleQuote: true,
11        printWidth: 120,
12        jsxSingleQuote: true
13      }
14    ]
Once you've completed the steps above, the full eslint.config.js code will look like this:
DummyComponent.jsx
1import js from '@eslint/js'
2import globals from 'globals'
3import reactHooks from 'eslint-plugin-react-hooks'
4import reactRefresh from 'eslint-plugin-react-refresh'
5import tseslint from 'typescript-eslint'
6import eslintPluginPrettier from 'eslint-plugin-prettier'
7
8export default tseslint.config(
9  { ignores: ['dist'], prettier: eslintPluginPrettier },
10  {
11    extends: [js.configs.recommended, ...tseslint.configs.recommended],
12    files: ['**/*.{ts,tsx}'],
13    languageOptions: {
14      ecmaVersion: 2020,
15      globals: globals.browser,
16    },
17    plugins: {
18      'react-hooks': reactHooks,
19      'react-refresh': reactRefresh,
20    },
21    rules: {
22      ...reactHooks.configs.recommended.rules,
23      'react-refresh/only-export-components': [
24        'warn',
25        { allowConstantExport: true },
26      ],
27      'prettier/prettier': [
28        'warn',
29        {
30          arrowParens: 'always',
31          semi: false,
32          trailingComma: 'none',
33          tabWidth: 2,
34          endOfLine: 'auto',
35          useTabs: false,
36          singleQuote: true,
37          printWidth: 120,
38          jsxSingleQuote: true
39        }
40      ]
41    },
42  },
43)
44
🥸 Step 4 - Configure Prettier to Format Code
Create a .prettierrc file in the root directory with the following content:
DummyComponent.jsx
1{
2  "arrowParens": "always",
3  "semi": false,
4  "trailingComma": "none",
5  "tabWidth": 2,
6  "endOfLine": "auto",
7  "useTabs": false,
8  "singleQuote": true,
9  "printWidth": 120,
10  "jsxSingleQuote": true
11}
The purpose is to configure Prettier. You should install the Prettier - Code formatter extension for VS Code so it understands the settings. Next, create a .prettierignore file in the root directory. The purpose of this file is to tell Prettier to ignore unnecessary files.
DummyComponent.jsx
1node_modules/
2dist/
👌 Step 5 - Configure the Editor to Standardize Editor Settings
Create an .editorconfig file in the root directory. The purpose of this file is to standardize editor settings across the team, especially when there are multiple people working on the project.
To make VS Code recognize this file, you need to install the EditorConfig for VS Code extension.
DummyComponent.jsx
1[*]
2indent_size = 2
3indent_style = space
💻 Step 6 - Configure Aliases for tsconfig.json
Adding aliases in the tsconfig.json file will help VS Code understand and automatically import the necessary files for us. Note that this will only help in the development environment and won't affect the build process.
Your tsconfig.json file will look something like this:
DummyComponent.jsx
1{
2  "files": [],
3  "references": [{ "path": "./tsconfig.app.json" }, { "path": "./tsconfig.node.json" }],
4  "compilerOptions": {
5    "baseUrl": ".",
6    "paths": {
7      "~/*": ["src/*"]
8    }
9
The meaning of this is that we can import Login like this:import Login from '~/pages/Login' instead of import Login from '../../pages/Login'.
It's much shorter and easier to read!
⌨️ Step 7 - Configure Aliases for Vite in vite.config.ts
Install the package @types/node to use Node.js in TypeScript files without errors.
DummyComponent.jsx
1npm i @types/node -DConfigure Alias and Enable Source Map in vite.config.ts
DummyComponent.jsx
1// https://vitejs.dev/config/
2export default defineConfig({
3  plugins: [react()],
4  server: {
5    port: 3000
6  },
7  css: {
8    devSourcemap: true
9  },
10  resolve: {
11    alias: {
12      '~': path.resolve(__dirname, './src')
13    }
14  }
15})
Open package.json and Add the Following Scripts for Convenience:
DummyComponent.jsx
1{
2  "scripts": {
3    "dev": "vite",
4    "build": "tsc && vite build",
5    "lint": "eslint src --ext .js,.jsx,.ts,.tsx",
6    "lint:fix": "eslint src --ext .js,.jsx,.ts,.tsx --fix",
7    "format": "prettier --write \"src/**/*.{js,jsx,ts,tsx}\"",
8    "preview": "vite preview"
9  }
10}
"Now you can run npm run lint to check for errors, or npm run format to automatically beautify your code! ✨
🗂️ Step 5: Standard Project Folder Structure 2025
A professional project needs a clear folder structure. Below is the standard structure commonly used by dev teams. You can check it out here for the full details, as I’ve analyzed it thoroughly for you, check it out now.
Step 6: Create a Sample Component"
DummyComponent.jsx
1import React from 'react'
2
3const App: React.FC = () => {
4  return (
5    <div className="min-h-screen bg-gradient-to-br from-blue-200 to-purple-300 flex items-center justify-center p-4">
6      <div className="bg-white rounded-xl shadow-2xl p-8 max-w-md w-full text-center">
7        <h1 className="text-4xl font-bold text-purple-600 mb-4">
8          Yo! Chào mừng bạn! 🎉
9        </h1>
10        <p className="text-gray-700 mb-6">
11          Đây là dự án React siêu xịn với Vite, TypeScript, Tailwind, ESLint và Shadcn/UI.
12          Sẵn sàng để bạn "quẩy" code chưa? 😎
13        </p>
14        <button className="bg-purple-500 text-white px-6 py-2 rounded-full hover:bg-purple-600 transition">
15          Let's Code!
16        </button>
17      </div>
18    </div>
19  )
20}
21
22export default App
🚀Step 7: run project
DummyComponent.jsx
1
2Run these commands to check:
3# Format code
4npm run format
5
6# Check for link erorr
7npm run lint
8
9# Automatically fix lint errors
10npm run lint:fix
11
12# run dev server
13npm run dev
Here’s the translation:
"Open http://localhost:5173, and you’ll see an awesome interface! 😍
🎉 Step 8: Additional Options - React Router & Shadcn/UI Want to create a multi-page app and add some cool UI components? Let’s integrate React Router and shadcn/ui!
8.1. Install React Router
Install React Router to manage pages:
DummyComponent.jsx
1npm install react-router-domUpdate src/main.tsx :
DummyComponent.jsx
1import React from 'react'
2import ReactDOM from 'react-dom/client'
3import { BrowserRouter } from 'react-router-dom'
4import App from './App'
5import './index.css'
6
7ReactDOM.createRoot(document.getElementById('root')!).render(
8  <React.StrictMode>
9    <BrowserRouter>
10      <App />
11    </BrowserRouter>
12  </React.StrictMode>,
13)
8.2. Install Shadcn/UI
What is Shadcn/UI that’s been so popular lately?
shadcn/ui is a modern UI component library for React, built with:
- Tailwind CSS → for quick styling and easy customization.
- Radix UI → for components with complex logic like Dialog, Dropdown, Tooltip, etc.
- Framer Motion (optional) → for smooth animations.
Shadcn/UI is a beautiful component library, easy to customize, and integrates perfectly with Tailwind. Let’s install it:"
DummyComponent.jsx
1npx shadcn@latest initWhen running the command, you will be asked a few questions. Select the following options that best fit your project:
DummyComponent.jsx
1Which color would you like to use as base color? › NeutralNow you can start adding components to your project by:
DummyComponent.jsx
1npx shadcn@latest add buttonIt looks like you've already provided the sentence in English. Let me know if you'd like any adjustments or further translation!
8.4. Update Routes and Use Shadcn/UI
Create the file src/routes/index.tsx to manage routes:
DummyComponent.jsx
1import { Routes, Route } from 'react-router-dom'
2import Home from '../pages/Home'
3import About from '../pages/About'
4
5const AppRoutes: React.FC = () => {
6  return (
7    <Routes>
8      <Route path="/" element={<Home />} />
9      <Route path="/about" element={<About />} />
10    </Routes>
11  )
12}
13
14export default AppRoutes
Create the file src/pages/Home.tsx to test shadcn/ui:
DummyComponent.jsx
1import React from 'react'
2import { Button } from '../components/ui/button'
3
4const Home: React.FC = () => {
5  return (
6    <div className="min-h-screen bg-gradient-to-br from-blue-200 to-purple-300 flex items-center justify-center p-4">
7      <div className="bg-white rounded-xl shadow-2xl p-8 max-w-md w-full text-center">
8        <h1 className="text-4xl font-bold text-purple-600 mb-4">
9          Trang Chủ Siêu Xịn! 🎉
10        </h1>
11        <p className="text-gray-700 mb-6">
12          Dùng Shadcn/UI và React Router để tạo app đẹp lung linh!
13        </p>
14        <Button variant="default" className="bg-purple-500 hover:bg-purple-600">
15          Nhấn Vô Nè!
16        </Button>
17      </div>
18    </div>
19  )
20}
21
22export default Home
Create file src/pages/About.tsx:
DummyComponent.jsx
1import React from 'react'
2import { Button } from '../components/ui/button'
3
4const About: React.FC = () => {
5  return (
6    <div className="min-h-screen bg-gradient-to-br from-green-200 to-blue-300 flex items-center justify-center p-4">
7      <div className="bg-white rounded-xl shadow-2xl p-8 max-w-md w-full text-center">
8        <h1 className="text-4xl font-bold text-green-600 mb-4">
9          Giới Thiệu Nè! 😎
10        </h1>
11        <p className="text-gray-700 mb-6">
12          Đây là trang giới thiệu, dùng Shadcn/UI để thêm component xịn!
13        </p>
14        <Button variant="outline">Khám Phá Thêm</Button>
15      </div>
16    </div>
17  )
18}
19
20export default About
Update src/App.tsx to use routes:
DummyComponent.jsx
1import React from 'react'
2import AppRoutes from './routes'
3
4const App: React.FC = () => {
5  return (
6    <div className="min-h-screen">
7      <AppRoutes />
8    </div>
9  )
10}
11
12export default App
💡 Tips for a Happy Developer
- Performance: Vite is as fast as a sports car, builds the project in just a few seconds.
- Easy Debugging: TypeScript catches errors early, no more 'undefined is not a function'!
- Teamwork: ESLint and Prettier keep the code consistent, making the whole team happy.
- Cool UI: Shadcn/UI + Tailwind makes beautiful interfaces without the hassle.
- Navigation: React Router ensures smooth multi-page apps.
🎈 Conclusion
You now have a super cool React project with Vite, TypeScript, Tailwind CSS, ESLint, React Router, and shadcn/ui! A clear folder structure, clean code, and a gorgeous UI, ready to tackle any real-world task. 😎
Run npm run dev, admire your app, and start coding!
Happy coding! 🚀